Tagging is an important part of every company organization. We all use tags for one reason or another, as it keeps things running smoothly. No matter if your customer success team uses tags in Gorgias to keep track of unresolved bugs, common questions, or just how changes can affect incoming queries, there’s no denying tagging is crucial.
However, some people take tagging for granted and they don’t even think about properly organizing them. If you’re managing your tags in Gorgias, you’ll be happy to learn that there are certain practices that can keep your tags in line.
Why tagging is important
One of the biggest mistakes you can make is to use tagging without a clear and organized process. If you’re not consistent or just don’t consider tagging as a priority, your company will pay for it in the long run.
If you haven’t adopted this process, you will probably need to re-tag a lot of tickets after they’ve been closed as soon as you realize your mistake. Otherwise, your workflow and your ticket analytics will be disrupted due to inconsistent tagging which will make workers and agents confused.
To train a machine learning algorithm, all of your tagging needs to be well-structured and should provide clean and easy-to-understand data. The machine learning model can automate tagging only if a computer can read and digest this data without any difficulties.
Well-organized tagging is also important because it can help you understand what drives customer trends.
What’s more, it finds the connections between unsatisfied customers and certain tags.
3 questions to ask yourself before actually starting to organize tags

Before you start, think about which organizing system you want to use. To figure out the answer, there are three questions you need to ask yourself first.
Answering them will ring you one step closer to finding the perfect way to organize your tags.
1. Am I using arbitrary categories to organize my tags?
Arbitrary categories are those you don’t understand right away. If you notice a trending tag, you should immediately know if this is a good or a bad thing.
For instance, if you have a category “payments” that was trending, you may not be sure if it was due to productive or unnecessary contacts. However, if you name a tag “payment failed”, you immediately know that there is an issue that needs to be solved.
Additionally, tags that are nothing more than meaningless catch-all buckers such as “interesting” or “cool” are every tag organizer’s worst nightmare. Instead, always stick to tags with clear meaning and purpose.
2. Is it more important to know what happened or why it happened?
A lot of companies organize conversations based on what happened before a ticket was made. However, sometimes it’s more important to know why an issue occurred rather than the issue itself.
For example, if a customer emails you about not receiving an order, a ticker with the name “shipping issues” isn’t helpful when it’s time to solve the problem that caused the issue. Instead, inquire why the problem arose and create a ticket that explains it, such as “warehouse delays”.
3. Is it clear who/what caused the problem?
Problems happen all the time and there’s no need to blame your coworkers when they do. Still, if you do know who is responsible for the problem or issue, it will be much easier to resolve it.
6 best practices for organizing tags
Here are six best practices you need to apply when organizing your tags if you want a tagging system that works like a well-oiled machine.
Make sure your tags can be used consistently
Guidelines are necessary, both for machines and for humans. It’s important to make sure there are no overlaps in your tags or anything else that may cause confusion. Avoid overlapping concepts and define each one so its purpose is clear.
Each of your tags needs to be defined with one or two sentences that are clear and don’t have any conditions.
Remove all small and unimportant tags
Not all tickets deserve tags. If an issue that doesn’t occur often enough comes up, it doesn’t require tagging. If you tag every minor issue that comes along, you will end up with a high number of tags that only have just a couple of tickets each.
Quality over quantity
Not only is it impossible to track such a large number of tags, but it’s also time-consuming. If you have hundreds of tags, you need to re-think your approach. Keep in mind that humans have cognitive constraints and can’t keep track of too many tags.
The optimal number of tags is 30 or fewer.
Respect the hierarchy
Nest your tags in a hierarchy that will help you group different subtags together. When you organize your tags according to their semantic relations, you end up with a well-structured tree that both humans and machines understand.
Group tags that share any commonalities according to a hierarchy. For instance, tags such as baseball, basketball, and football, can all be subtags of “sports”.
Use only one classification criterion per field
If you’re tagging issues based on different criteria, don’t mix apples and oranges. While an issue must have all of these tags, you should also separate each of them into their own custom fields. If one issue is tagged with product area, contact reason, and fix, all of those deserve individual fields.
Explicitly state all of your data
If you haven’t already automated the tagging process but are planning to do so in the future, you need to examine all of your tags as a machine would. Keep in mind that machines don’t have the same context as humans do and can only examine the content stored in the ticket.
Don’t use outside information such as client IDs and their email addresses to tag tickets, as machines don’t understand and cannot process this type of information.
How to use tags in Gorgias
Now let’s see how you can use tags in Gorgias. This helpdesk offers a number of ways to efficiently use and organize tags, thus saving your time and effort.
How to create a tag
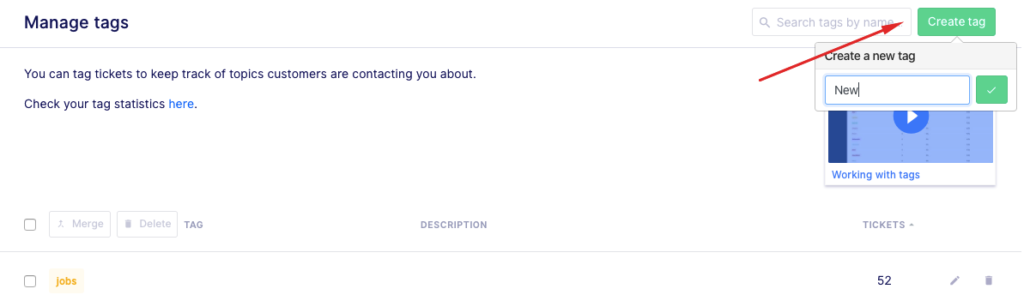
To create a tag in Gorgias you need to be an admin. Agents can’t create tags.
The following steps show you how to create a tag:
- Click on “Tickets” on the top left of your page and go to “Settings”.
- Next, click on “Tags” located near the end of the list of settings.
- There you can see all of your tags on a page called “Manage tags”. You need to click on the “Create tag” button on the top right of the page and name it.
- The newly created tag will appear among all other tags.
- Click on “edit” to choose the color of the tag and then click Save.
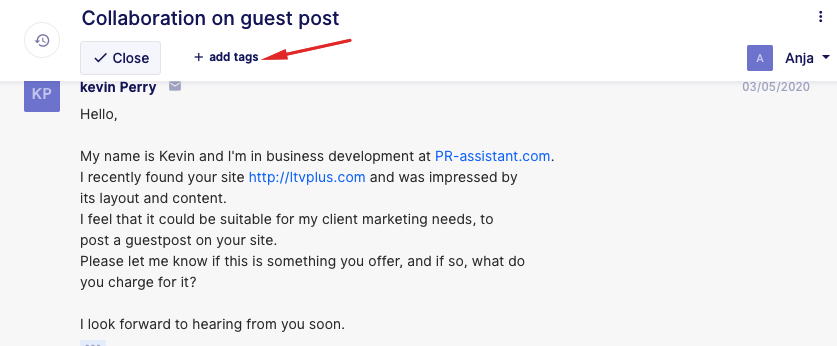
Then you can create a new tag directly on the ticket:
- Choose a ticket
- Click on the + icon and type the name of the ticket.
- You will get the option to create a ticket with that name.
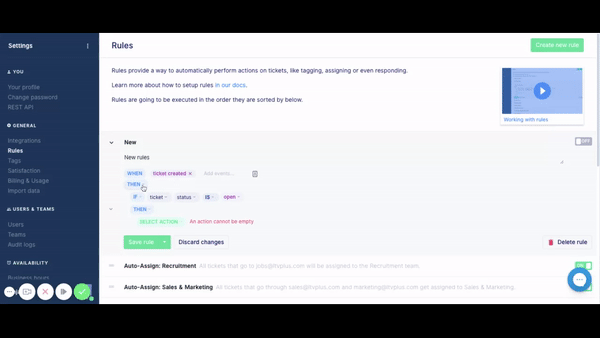
How to create rules that will automatically assign tags in Gorgias
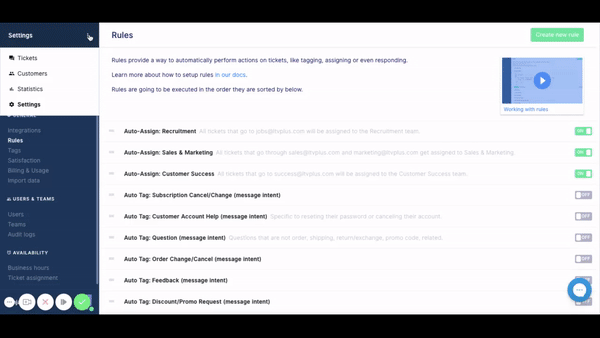
- Click on “Settings” and then on “Rules”.
- Select “Create new rule”.
- Name your rule as “X Tag apply” (you can write the same thing in the rule’s description).
- Click on “Create rule”.
- Choose categories for the “When” column that specifies which action sets off the tag.
- Select the “Then” button and choose between “Action” and “If statement”.
- For the “If statement” you choose the criteria for the “If” category. You can add more criteria by clicking on the “If” button and choosing “And” and “Or”.
- Click on the “Then” button and choose between “Action” and “If statement” to select what the tag will do.
- Then choose “Save” and “Activate”.
How to create a new view
- Go to “Settings” and open “Tickets”.
- Navigate to “Views” and select “Create new view”.
- Name your view.
- Click on “Add filter” and “Tags”.
- Then, open the “Select a value” option and choose “X Tag”.
- Click on “Add filter” and select the status.
- Choose between “Open” and “Closed”
- You can also choose any other additional filters.
- Finally, click on “Create view”.
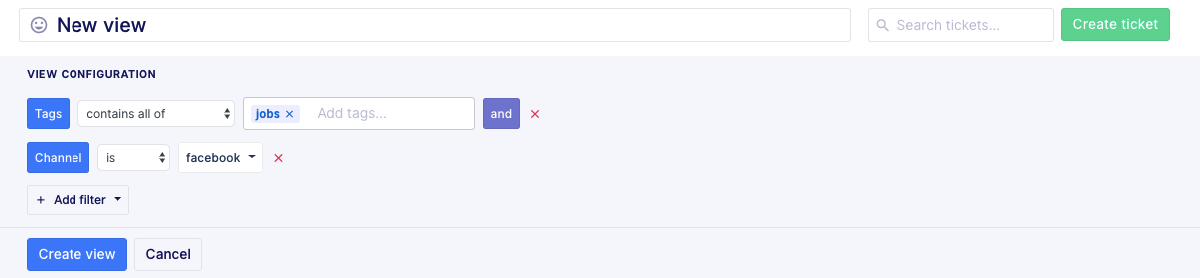
Everything that matches the criteria you have selected will appear in this view and will have the tag you selected.
How to see your tag’s statistics
- Open the “Tickets” option and click on “Statistics”.
- Select “All tags” to sort things by tags.
- When you open a tag, you will get the categories
- First response time
- Resolution time
- One-touch tickets
- Select the time frames to choose the period of time for which you want to check your ticket statistics.
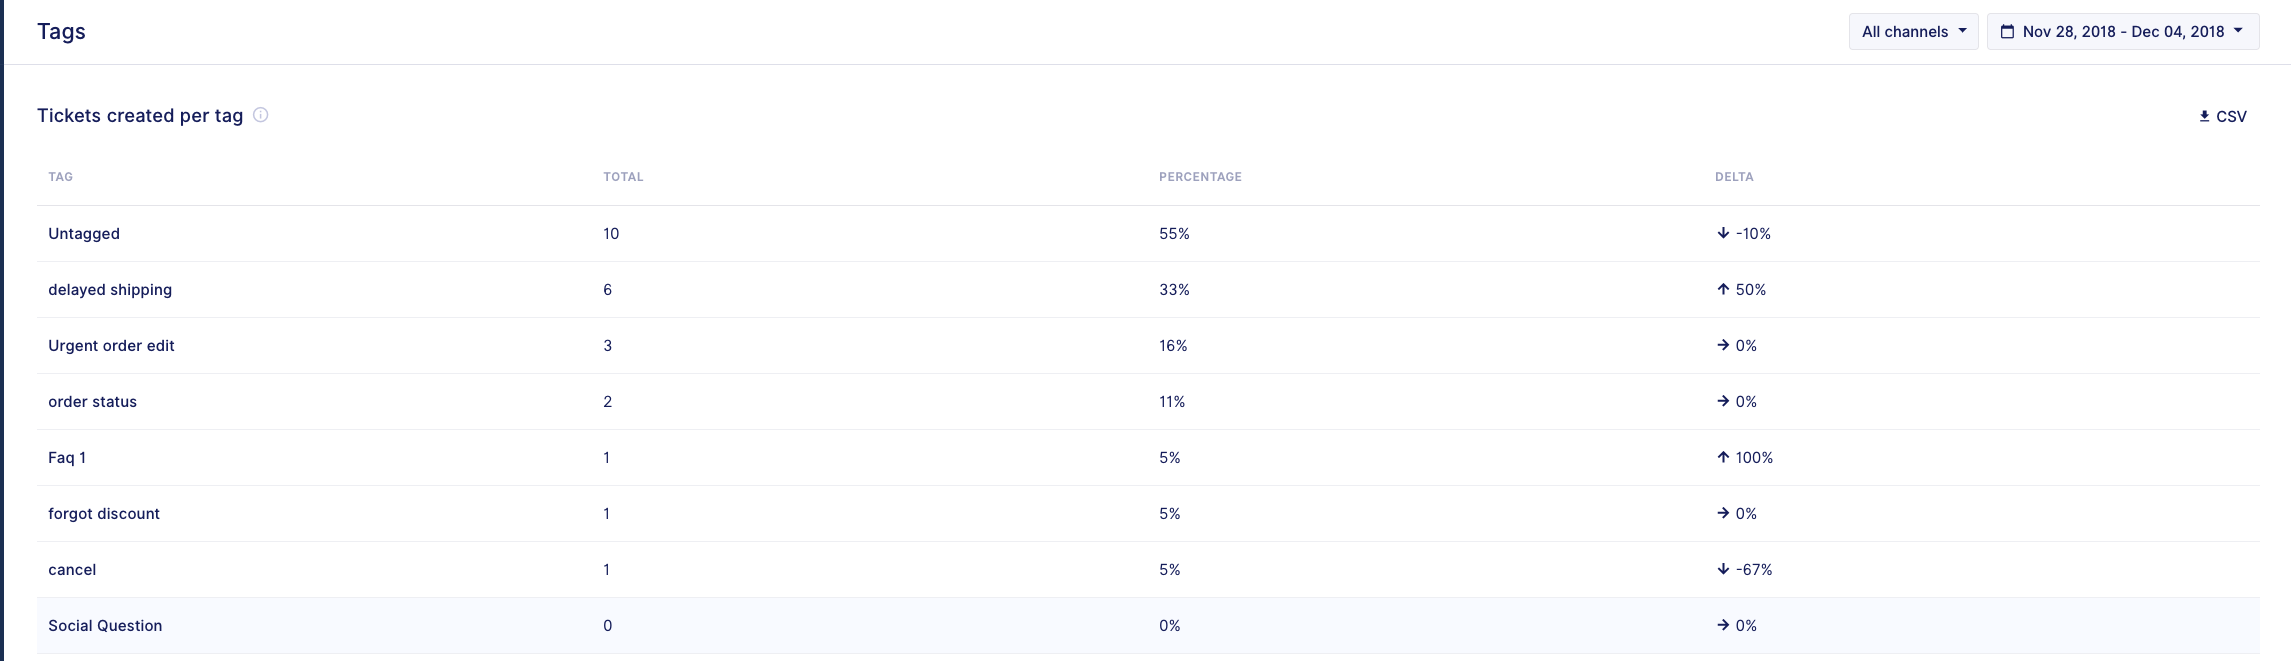
It’s important to keep track of your tag’s statistics so you have insight on how quickly issues are being resolved.
How to combine rules and tags in Gorgias
Now let’s take a look at how you can set up automated actions by using the Rules feature.
Auto-closing and auto-tagging tickets
To take full advantage of this feature, simply click on Tickets and then on Settings.
Move on to Rules and look at the upper right corner where you can find the Create new rule button.
Click on the button, name the rule, and add a description to let your team members know the purpose of the rule.
Set at what moment this rule is going to be triggered. For this purpose, it should be triggered as soon as a ticket is created.
Take a look at what this sequence of action should look like.
- WHEN – ticket created
- THEN
- IF – message intents name – CONTAINS ONE OF – other/no_reply
- THEN
- SET STATUS – closed
- The last step is to click on the Save rule button.
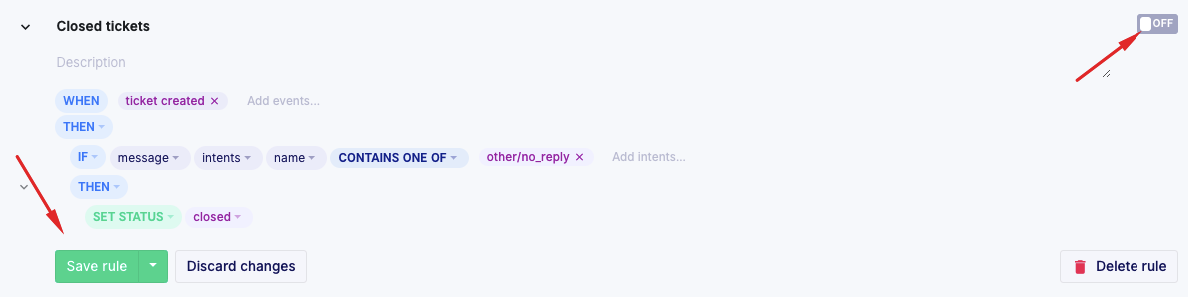
The rule you have just created will automatically close what you don’t want to read.
Finally, enable the rule by clicking on the button found on the right side. Once you have enabled it, it will say ON and become green.
Now let’s see what you should do if you want to automatically tag certain customers (big spenders, etc.).
To do so, you need to create a rule similar to the one above.
- WHEN – ticket created
- IF – ticket customer – integrations – Shopify or another integration – customer total spent – IS GREATER OR EQUAL TO – your preferred amount
- THEN
- ADD TAGS – actions – VIP
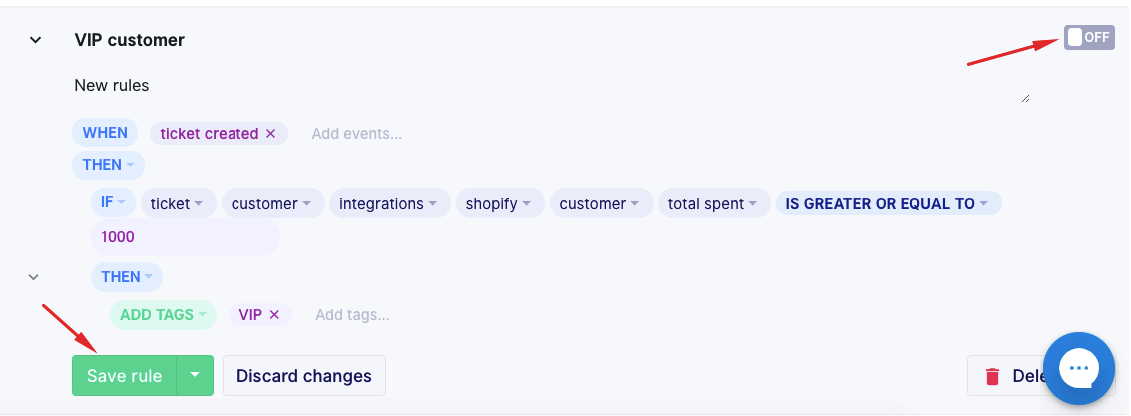
Once you are done, just save the rule and enable it.
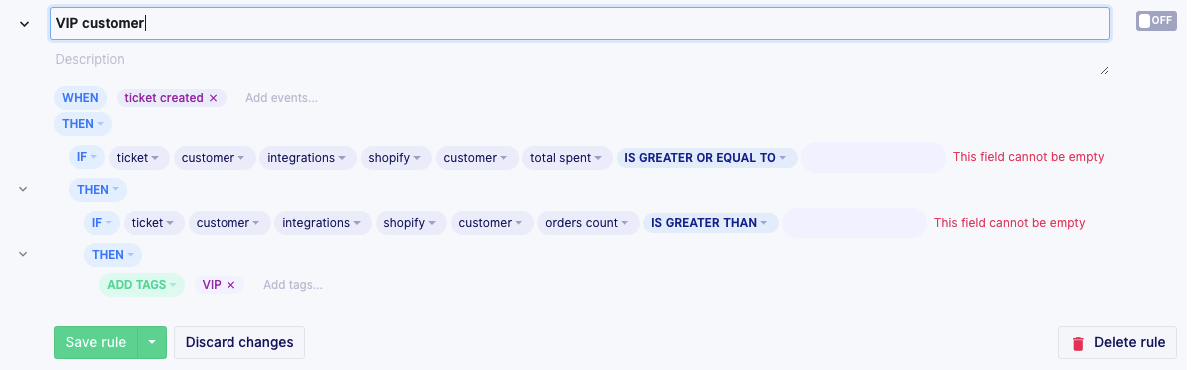
If you want to expand this sequence and not limit it to the amount your customers are spending to become VIP members, you can also add another line that counts the number of orders a given customer has made.
- WHEN – ticket created
- IF – ticket – customer integrations – (Shopify or another integration) – customer total spent – IS GREATER OR EQUAL TO – (your preferred amount)
- IF – ticket customer integrations – e.g. Shopify – customer orders count – IS GREATER THAN – your preferred number
- THEN
- ADD TAGS – actions – VIP
- Again, just save the rule and enable it.
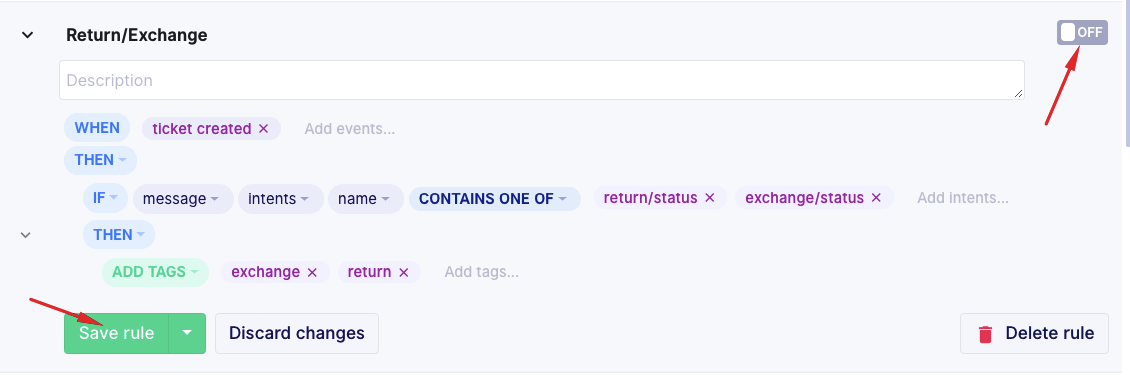
How to automatically tag tickets using customer intents
Head over to Settings, click on Rules and Create new rule to actually start the creation process.
Note: This rule only applies to messages regarding specific intents (ongoing exchange, shipping, etc.), not messages coming from your agents.
- WHEN – ticket created
- THEN
- IF – message intents name – CONTAINS ONE OF – return/status exchange/status
- AND – message from agent – IS – false
- THEN
- ADD TAGS – return/exchange status
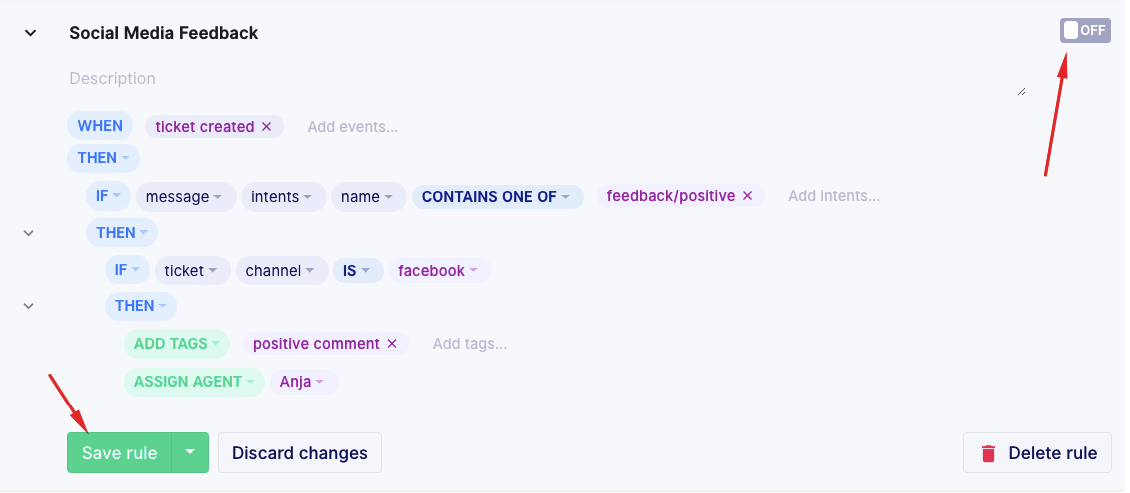
How to automatically tag Facebook and Instagram comments
Social media is very important. There you can find both positive and negative reviews that can help you learn how and what you can improve.
Take a look at which steps you should take to automatically tag Facebook and Instagram comments (both positive and negative):
- WHEN – ticket created – new message in ticket
- THEN
- IF – message intents name – CONTAINS ALL OF – feedback/negative (you can also choose positive comments)
- THEN
- IF – message channel – IS – Facebook (or Instagram, you can select that too)
- OR – message channel – IS – Instagram-comment
- THEN
- ASSIGN AGENT – Name Surname
- ADD TAGS – Negative Comment
How to automatically reply after business hours
If you are interested in creating an automated response that is sent during business hours or after business hours, take a look below.
- WHEN – ticket created
- THEN
- IF – ticket created – OUTSIDE BUSINESS HOURS
- IF – ticket from agent – IS – false
- IF – ticket channel – IS – email
- THEN – reply to ticket
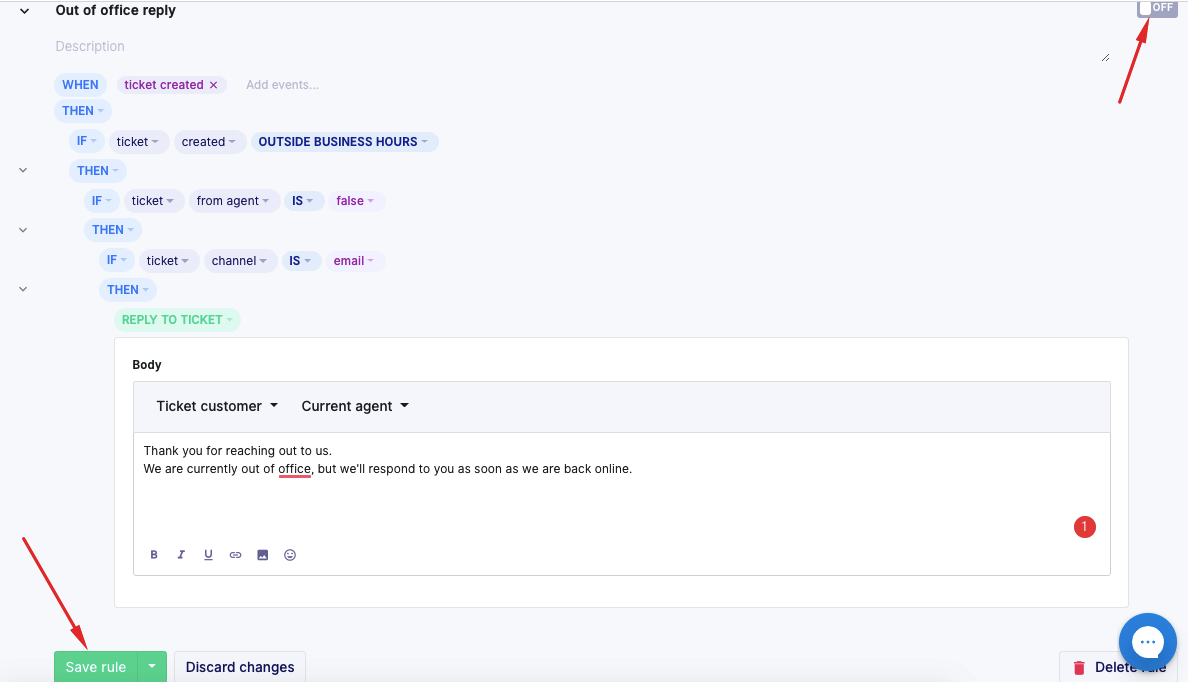
You will see a pop-up box where you can type in a message you want your customers to get when they submit a ticket. Just select the functionality of the response automatically addressing your customer by their name and type in the rest of the message.
How to automatically tag tickets with customer sentiments
Finally, let’s see how you can create a simple rule to tag tickets using customer sentiments. The point here is to apply special tags to tickets that require extra attention.
So, create a new rule, name it and add a description.
Before you read the sequence, bear in mind that there are six sentiment options.
- WHEN – ticket created – new message in ticket
- THEN
- IF – message from agent – IS – false
- AND – message sentiments name – CONTAINS ONE OF – menacing/negative/offensive (you can select an option or a couple of them)
- THEN
- ADD TAGS – Negative
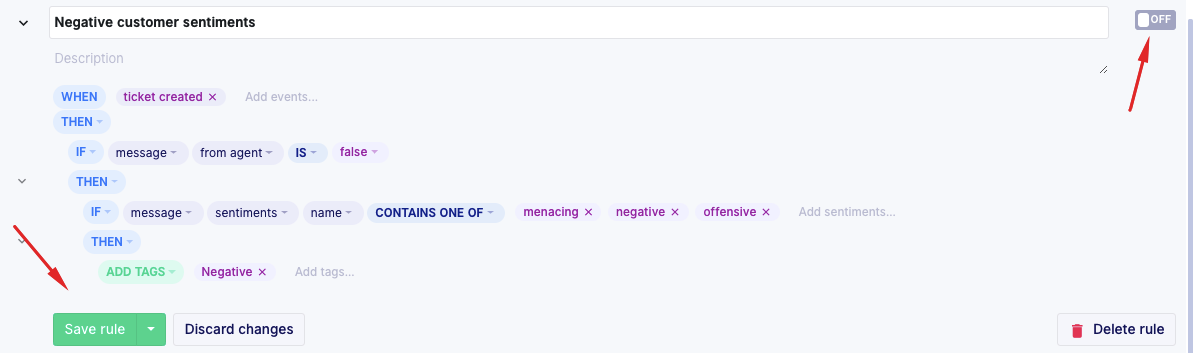
And that’s all there is to it. You have created a rule that will automatically tag negative tickets. The same process applies to positive tickets, just switch optional choices from negative to positive.
Final thoughts
Well-organized tags and tickets are one of the foundations of every successful business, especially in this digital age. The best practice you can use is automating the entire process, as it can be too demanding for a human to keep track of so many tickets.
As long as you realize the importance of tagging and how to organize your tags in Gorgias, you’re one step closer to having a perfect ticket system. All when you learn how to use tags in Gorgias, issues with organizing tags will be left in the past.